
Python has included the Tk interface module (tkinter) since versions 2.7 and 3.1. The module is a binding to version 8.5 of the Tk GUI suite for making windowing applications. My first installed version of Python was 2.7, so I’ve been aware of the module for over ten years but never explored it.
At the beginning of this month, I decided to dive in. It led to an intense two-week bout of 12+ hour days, but I emerged with working apps (and my sanity). This post and ones to come document and share what I’ve learned.
This first post is intended for those with no experience doing this, so we’ll start as simply as possible by creating a window. For these first few examples, you’ll need to open IDLE (Integrated Development & Learning Environment; from the standard Python install) and enter the lines by hand.
In fact, these first examples won’t work unless you do. IDLE has some special handling especially for using the tkinter module.
To begin with the simplest possible window — a literal one-liner (except for the import line) — enter the following code:
002|
003| # Create a window…
004| tk.Tk()
005|
You can type this into the editor window, save it to a file, and then run it, or you can just type the lines in the shell window and execute them directly. Either way, the second line makes a small unadorned Tk window pop up:

Close it by clicking the ⌧ in the upper-right corner.
Congrats! You just created your first window. Note that if you run your code fragment outside of IDLE, it just runs and exits and no window appears. You must do these examples in IDLE (we’ll get away from that soon enough).
The first example makes clear that calling the Tk function is what creates the window. In some cases, the next step is to hide the window until it’s ready to be shown, but that isn’t necessary for these simple examples.
We want to do things with the window we created, like add a menu bar and various widgets that comprise our app, so we need to save the return value of the call to Tk. Canonically, we save this in a variable named root:
002|
003| # Create a window (save return value)…
004| root = tk.Tk()
005|
Running this (or typing it into the shell window) opens the same window as before. Be sure to close it before continuing. Note that closing the shell window will also close the window.
This next example illustrates why we need the root variable:
002|
003| # Create a window; set title; set geometry…
004| root = tk.Tk()
005| root.title(‘A Simple Window’)
006| root.geometry(‘480×240+300+100’)
007|
Now the window looks a little different:
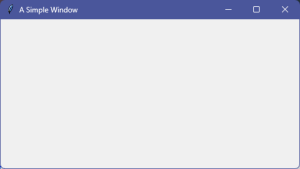
We set the window’s title with the call to root.title and window’s size and location on screen with the call to root.geometry. One common technique we’ll use a lot is calling for a new object and then setting parameters on the returned object.
Before we continue, we should up our game and get away from the dependence on IDLE. From here on, these examples can be run as you would run any Python script. this requires adding a call to the root.mainloop method:
002|
003| def open_the_window (ttl=‘The Window’, geo=‘480×240+300+100’):
004| ”’Create a new window.”’
005|
006| # Create window; set title & geometry…
007| root = tk.Tk()
008| root.title(ttl)
009| root.geometry(geo)
010|
011| # Return root object…
012| return root
013|
014|
015| if __name__ == ‘__main__’:
016| print()
017| # Create the window…
018| app = open_the_window()
019|
020| # Start the window loop…
021| app.mainloop()
022| print()
023|
The open_the_window function (lines #3 to #12) takes ttl (title) and geo (geometry) parameters, creates essentially the same window as did the previous example (but parameterized), and returns the root object (the window itself).
The key change in this code is on line #21, the call to root.mainloop. This is what enables the script to create its window when run as a regular Python script. (There is a wrinkle about using pythonw.exe rather than python.exe, but we’ll get to that down the road.)
For our next step, we’ll start to make this more like a real app by first adding a menu bar and then a command on that menu bar to close the window the “official” way (rather than using the ⌧ in the upper right):
002|
003| def open_the_window (ttl=‘The Window’, geo=‘480×240+300+100’):
004| ”’Create a new window.”’
005| root = tk.Tk()
006| root.title(ttl)
007| root.geometry(geo)
008|
009| def window_close ():
010| ”’Close the window.”’
011| # Destroy the main window…
012| # (Returns us from mainloop.)
013| root.destroy()
014|
015| # Create simple menubar…
016| menubar = tk.Menu(root)
017|
018| # Add a command to the menubar…
019| menubar.add_command(label=‘Exit’, command=window_close)
020|
021| # Add menubar to main window…
022| root.config(menu=menubar)
023|
024| # Return root object…
025| return root
026|
027|
028| if __name__ == ‘__main__’:
029| print()
030| # Create the window…
031| app = open_the_window()
032|
033| # Start the window loop…
034| app.mainloop()
035| print()
036|
I’ll warn you now that these apps tend to get long. Not complicated, but lots of lines of code needed to do things. You can see the line-count growing already, and we’ve hardly begun.
We’ve added the window_close function (lines #9 to #13) and three lines that build a simple menu bar with one item. Line #16 creates a new menu. Line #19 adds a menu item labeled “Exit” to that menu. It also sets the binds the item to the window_close function. Line #22 sets the root window’s menu property to be the menu we just created. This appears in the app window as its menu bar.
The window_close function calls root.destroy, which closes the app window and exits from the root.mainloop call in line #34. The “main loop” is essentially an event loop that manages the window.
When run, we get this window:
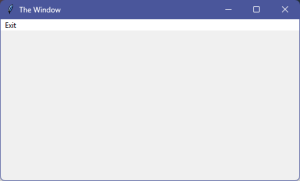
Clicking Exit on the menu bar closes the window.
We can expand on this a little and introduce a new tool:
002| import tkinter.messagebox as msgbox
003|
004| def open_the_window (ttl=‘The Window’, geo=‘480×240+300+100’):
005| ”’Create a new window.”’
006| root = tk.Tk()
007| root.title(ttl)
008| root.geometry(geo)
009|
010| def window_close ():
011| ”’Close the window.”’
012| root.destroy()
013|
014| def about ():
015| ”’Popup the About message box.”’
016| msgbox.showinfo(‘About’, ‘Simple Tk Application.’)
017|
018| # Create simple menubar…
019| menubar = tk.Menu(root)
020| menubar.add_command(label=‘Exit’, command=window_close)
021| menubar.add_separator()
022| menubar.add_command(label=‘About’, command=about)
023| # Add menubar to main window…
024| root.config(menu=menubar)
025|
026| # Return root object…
027| return root
028|
029|
030| if __name__ == ‘__main__’:
031| print()
032|
033| # Create window and loop…
034| app = open_the_window()
035| app.mainloop()
036| print()
037|
Here we add the about function (lines #14 to #16) and an “About” item to the menu bar (line #22). The about function calls the showinfo function (from the tkinter.messagebox submodule) to pop up a simple “About” box.
For simple apps, a simple menu bar may be sufficient, but often you’ll want the usual sort of menu bar with dropdown submenus and various options. Here’s a template for the standard Windows app menu bar:
002| import tkinter.messagebox as msgbox
003|
004| def open_the_window (ttl=‘The Window’, geo=‘480×240+300+100’):
005| ”’Create a new window.”’
006|
007| def menu_command ():
008| ”’Handle menu selection.”’
009| print(‘Menu Choice.’) #ATTN: not helpful!
010|
011| def window_close (): #ATTN: bug!
012| ”’Close the window.”’
013| root.destroy()
014|
015| def about ():
016| ”’Popup the About message box.”’
017| msgbox.showinfo(‘About’, ‘Simple Tk Application.’)
018|
019| def build_menubar ():
020| ”’ Create real menubar.”’
021| menubar = tk.Menu(root)
022|
023| # Create File Sub-Menu…
024| mbarFile = tk.Menu(menubar, name=‘fileMenu’, tearoff=0)
025| mbarFile.add_command(label=‘New’, command=menu_command)
026| mbarFile.add_command(label=‘Open…’, command=menu_command)
027| mbarFile.add_command(label=‘Save’, command=menu_command)
028| mbarFile.add_command(label=‘Save As…’, command=menu_command)
029| mbarFile.add_separator()
030| mbarFile.add_command(label=‘Exit’, command=window_close)
031|
032| # Create Edit Sub-Menu…
033| mbarEdit = tk.Menu(menubar, name=‘editMenu’, tearoff=0)
034| mbarEdit.add_command(label=‘Copy’ , command=menu_command)
035| mbarEdit.add_command(label=‘Paste’, command=menu_command)
036|
037| # Create Help Sub-Menu…
038| mbarHelp = tk.Menu(menubar, name=‘helpMenu’, tearoff=0)
039| mbarHelp.add_command(label=‘About’, command=about)
040|
041| # Add sub-menus to MenuBar…
042| menubar.add_cascade(label=‘File’, menu=mbarFile, underline=0)
043| menubar.add_cascade(label=‘Edit’, menu=mbarEdit, underline=0)
044| menubar.add_cascade(label=‘Help’, menu=mbarHelp, underline=0)
045|
046| # Add menubar to main window…
047| root.config(menu=menubar)
048|
049| # Open-The-Window thread starts here…
050| root = tk.Tk()
051| root.title(ttl)
052| root.geometry(geo)
053| root.bind(‘<Escape>’, window_close)
054|
055| # Return root object…
056| build_menubar()
057| return root
058|
059|
060| if __name__ == ‘__main__’:
061| print()
062| app = open_the_window()
063| app.mainloop()
064| print()
065|
(I warned you these get long!). To organize things, I moved all menu-building code to its own function, build_menubar (lines #19 to #47). The change here is creating new menus (lines #24, #33, and #38) for dropdown submenus. We add command items to those. Separators make them menu look better.
Note that we’ve bound all the menu command items (except Exit and About) to the new function menu_command, which lets us know it was called by printing “Menu Choice”. When you run the code and make menu selections in the window, each one prints a line in the shell window:
Menu Choice.
Menu Choice.
Menu Choice.
Menu Choice.
Menu Choice.
Menu Choice.
We add the submenus to the menu bar in lines #42 to #44 using the add_cascade method and add the menu bar itself to the window in line #47 (same as before). Now we have the usual sort of Windows menus:
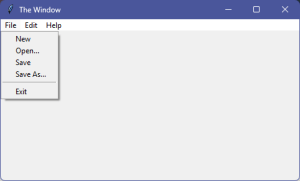
For Windows-style menus, be sure to use the tearoff keyword argument and set it to 0. Otherwise, each submenu will have a dashed line across the top that allows the user to “tear off” the menu and place it somewhere else on the screen:
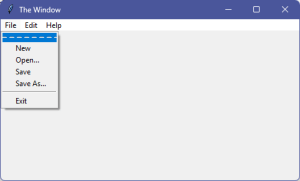
In fact, tearing a menu off turns it into a window of its own. One that can be resized., so probably not what’s desired in most apps.
The window-creation code begins on line #49 and calls the build_menu function on line #56. Note that we’ve added something new in line #53 — a binding between the user pressing the [Esc] (escape) key and the window_close function. This lets the user close the window by pressing the escape key.
Every menu selection (besides Exit and About) calls the menu_command function, but that function has no way to know who called it. If we’re going to use a single function to handle multiple menu selections, we need a way to know which menu selection the user made. There are two solutions.
The first is, as with the Exit and About menu selections, bind each menu item to a separate function. Which, in most applications, is the best technique because it keeps separate functions separate. The downside is function bloat; this requires lots of functions. The canonical names I use are file_new, file_open, file_save, file_saveas, file_exit, edit_copy, edit_paste, help_about, and whatever else needed to handle menu selections.
(Note that file_exit and help_about replace the window_close and about functions in this list.)
The second, also useful in many situations, has the problem that when we bind a menu item (or button) to a command, the Tk engine calls the bound function with no parameters identifying the caller. But we can use a simple coding trick to put an identifying “proxy” between Tk and the function:
002| import tkinter.messagebox as msgbox
003|
004| def open_the_window (ttl=‘The Window’, geo=‘480×240+300+100’):
005| ”’Create a new window.”’
006|
007| def menu_command (*args):
008| print(f’Menu Choice: {args[0]}‘)
009|
010| def window_close (*args):
011| ”’Close the window.”’
012| root.destroy()
013|
014| def about (*args):
015| ”’Popup the About message box.”’
016| msgbox.showinfo(‘About’, ‘Simple Tk Application.’)
017|
018| def build_menubar ():
019| ”’ Create menubar.”’
020| menubar = tk.Menu(root)
021|
022| def proxy (menu_id):
023| ”’Menu Command proxy.”’
024| return lambda: menu_command(f’{menu_id}‘)
025|
026| # Create File Sub-Menu…
027| mbarFile = tk.Menu(menubar, name=‘fileMenu’, tearoff=0)
028| mbarFile.add_command(label=‘New’, command=proxy(‘New’))
029| mbarFile.add_command(label=‘Open…’, command=proxy(‘Open’))
030| mbarFile.add_command(label=‘Save’, command=proxy(‘Save’))
031| mbarFile.add_command(label=‘Save As…’, command=proxy(‘SaveAs’))
032| mbarFile.add_separator()
033| mbarFile.add_command(label=‘Exit’, command=window_close)
034|
035| # Create Edit Sub-Menu…
036| mbarEdit = tk.Menu(menubar, name=‘editMenu’, tearoff=0)
037| mbarEdit.add_command(label=‘Copy’ , command=proxy(‘Copy’))
038| mbarEdit.add_command(label=‘Paste’, command=proxy(‘Paste’))
039|
040| # Create Help Sub-Menu…
041| mbarHelp = tk.Menu(menubar, name=‘helpMenu’, tearoff=0)
042| mbarHelp.add_command(label=‘About’, command=about)
043|
044| # Add sub-menus to MenuBar…
045| menubar.add_cascade(label=‘File’, menu=mbarFile, underline=0)
046| menubar.add_cascade(label=‘Edit’, menu=mbarEdit, underline=0)
047| menubar.add_cascade(label=‘Help’, menu=mbarHelp, underline=0)
048|
049| # Add menubar to main window…
050| root.config(menu=menubar)
051|
052| # Open-The-Window thread starts here…
053| root = tk.Tk()
054| root.title(ttl)
055| root.geometry(geo)
056| root.bind(‘<Escape>’, window_close)
057|
058| # Return root object…
059| build_menubar()
060| return root
061|
062|
063| if __name__ == ‘__main__’:
064| print()
065| app = open_the_window()
066| app.mainloop()
067| print()
068|
Note the proxy function (lines #22 to #24). It takes a parameter, menu_id, and returns a (lambda) function that takes no parameters, and which invokes the menu_command function and passes it the menu_id value. This is called a closure, and it’s a very handy trick. The created lambda function “remembers” the menu_id passed to proxy.
So, each menu item ends up with its own unique (identifying!) lambda function bound to it, and all those lambda functions invoke the menu_command function. When you run the app now, the printout is:
Menu Choice: New
Menu Choice: Open
Menu Choice: Save
Menu Choice: SaveAs
Menu Choice: Copy
Menu Choice: Paste
Depending on your needs and preferences, for handling menu selections, button clicks, and other user inputs, you can either create lots of specific functions or use proxies to invoke general handlers.
Truth is, usually a general handler ends up dispatching to some set of functions, so the general technique is mostly useful when each menu selection or button click does something similar enough to be handled by the same function. One example might be a set of command buttons that all invoke similar commands (e.g. they all launch a browser window but to different a site). The handler function would be the same except for the site.
The next step may be something of a personal preference, but I think there’s a strong argument that using classes is more aligned with both Python and Tk. Regardless, I prefer it, so let’s switch from functions to classes:
002| import tkinter.messagebox as msgbox
003|
004| kwarg = lambda nm,dflt,typ,kw: typ(kw[nm]) if nm in kw else dflt
005|
006| class BasicWindowApp:
007| ”’Simple Tk Window class.”’
008|
009| def __init__ (self, **kwargs):
010| ”’New BasicWindowApp instance.”’
011| self.title = kwarg(‘title’, ‘The Window’, str, kwargs)
012| self.geom = kwarg(‘geo’, ‘480×240+300+100’, str, kwargs)
013|
014| self.root = tk.Tk()
015| self.root.title(self.title)
016| self.root.geometry(self.geom)
017| self.root.bind(‘<Escape>’, self.app_exit)
018|
019| # Return root object…
020| self._menubar()
021|
022| def command (self, command):
023| ”’Command handler.”’
024| print(f’Command: {command}‘)
025|
026| def app_exit (self, *args):
027| ”’Close window.”’
028| print(‘Exit App’)
029| self.root.destroy()
030|
031| def app_about (self, *args):
032| ”’About message box.”’
033| msgbox.showinfo(‘About’, ‘Simple Tk Application.’)
034|
035| def _menubar (self):
036| ”’ Create menubar.”’
037| self.menubar = tk.Menu(self.root)
038|
039| def proxy (menu_id):
040| ”’Menu Command proxy.”’
041| return lambda: self.command(f’M:{menu_id}‘)
042|
043| # Create File Sub-Menu…
044| self.mbarFile = tk.Menu(self.menubar, name=‘fileMenu’, tearoff=0)
045| self.mbarFile.add_command(label=‘New’, command=proxy(‘New’))
046| self.mbarFile.add_command(label=‘Open…’, command=proxy(‘Open’))
047| self.mbarFile.add_command(label=‘Save’, command=proxy(‘Save’))
048| self.mbarFile.add_command(label=‘Save As…’, command=proxy(‘SaveAs’))
049| self.mbarFile.add_separator()
050| self.mbarFile.add_command(label=‘Exit’, command=self.app_exit)
051|
052| # Create Edit Sub-Menu…
053| self.mbarEdit = tk.Menu(self.menubar, name=‘editMenu’, tearoff=0)
054| self.mbarEdit.add_command(label=‘Copy’ , command=proxy(‘Copy’))
055| self.mbarEdit.add_command(label=‘Paste’, command=proxy(‘Paste’))
056|
057| # Create Help Sub-Menu…
058| self.mbarHelp = tk.Menu(self.menubar, name=‘helpMenu’, tearoff=0)
059| self.mbarHelp.add_command(label=‘About’, command=self.app_about)
060|
061| # Add sub-menus to MenuBar…
062| self.menubar.add_cascade(label=‘File’, menu=self.mbarFile)
063| self.menubar.add_cascade(label=‘Edit’, menu=self.mbarEdit)
064| self.menubar.add_cascade(label=‘Help’, menu=self.mbarHelp)
065|
066| # Add menubar to main window…
067| self.root.config(menu=self.menubar)
068|
069| def __repr__ (self):
070| return f’<{type(self).__name__} @{id(self):08x}>‘
071|
072|
073| if __name__ == ‘__main__’:
074| print()
075| app = BasicWindowApp()
076| print(app)
077| app.root.mainloop()
078| print()
079|
There isn’t anything new here. This is just a refactoring of the code into a class. For one, this makes the code more reusable and extendable.
The only difference in operation is that the menu id strings now have the form “M:<command>”. The reason for this becomes apparent in next example. I wanted this example to focus on the shift from functions to classes.
We’ll come back to menus in the future, but now lets’ move on to actually putting something in our window:
002| import tkinter.messagebox as msgbox
003|
004| kwarg = lambda nm,dflt,typ,kw: typ(kw[nm]) if nm in kw else dflt
005|
006| class SimpleWindowApp:
007| ”’Simple Tk Window class.”’
008|
009| def __init__ (self, **kwargs):
010| ”’New BasicWindowApp instance.”’
011| self.title = kwarg(‘title’, ‘The Window’, str, kwargs)
012| self.geom = kwarg(‘geo’, ‘480×240+300+100’, str, kwargs)
013|
014| self.root = tk.Tk()
015| self.root.title(self.title)
016| self.root.geometry(self.geom)
017| self.root.bind(‘<Escape>’, self.app_exit)
018|
019| # Return root object…
020| self._widgets()
021| self._menubar()
022|
023| def command (self, cmd_id):
024| ”’Command handler.”’
025| print(f’Command: {cmd_id}‘)
026| if cmd_id.endswith(‘Exit’):
027| self.app_exit()
028|
029| def app_exit (self, *args):
030| ”’Close window.”’
031| print(‘Exit App’)
032| self.root.destroy()
033|
034| def app_about (self, *args):
035| ”’About message box.”’
036| msgbox.showinfo(‘About’, ‘Simple Tk Application.’)
037|
038| def _widgets (self):
039| ”’Create window widgets.”’
040| self.wndw = tk.Frame(self.root, bg=‘#999999’, relief=‘flat’)
041| self.wndw.pack(fill=‘both’, expand=True, padx=4, pady=(0,4))
042|
043| self.lbl_top = tk.Label(self.wndw)
044| self.lbl_top[‘text’] = ‘Step by step, this app grows and grows!’
045| self.lbl_top[‘bg’] = ‘#334455’
046| self.lbl_top[‘fg’] = ‘#ffcc66’
047| self.lbl_top[‘relief’] = ‘raised’
048| self.lbl_top[‘border’] = 2
049| self.lbl_top[‘font’] = (‘Arial’, 12, ‘bold’)
050| self.lbl_top.pack(side=‘top’, fill=‘x’, ipady=7)
051|
052| def proxy (button_id):
053| ”’Widgets Command proxy.”’
054| return lambda: self.command(f’B:{button_id}‘)
055|
056| self.cmndbtns = tk.Frame(self.wndw)
057| self.lbl_cmnds = tk.Label(self.cmndbtns, text=‘Commands:’)
058| self.lbl_cmnds.config(font=(‘Arial’, 11, ‘bold’), fg=‘#000099’)
059|
060| props = lambda ix: dict(text=f’Run #{ix}‘, command=proxy(f’#{ix}‘))
061| self.btn_cmnd1 = tk.Button(self.cmndbtns, **props(1))
062| self.btn_cmnd2 = tk.Button(self.cmndbtns, **props(2))
063| self.btn_cmnd3 = tk.Button(self.cmndbtns, **props(3))
064| self.btn_cmnd4 = tk.Button(self.cmndbtns, **props(4))
065| self.btn_exit = tk.Button(self.cmndbtns)
066| self.btn_exit[‘text’] = text=‘Exit’
067| self.btn_exit[‘command’] = proxy(‘Exit’)
068|
069| self.lbl_cmnds.pack(side=‘left’)
070| self.btn_cmnd1.pack(side=‘left’, padx=(10,0))
071| self.btn_cmnd2.pack(side=‘left’)
072| self.btn_cmnd3.pack(side=‘left’)
073| self.btn_cmnd4.pack(side=‘left’)
074| self.btn_exit.pack(side=‘left’, fill=‘x’, expand=True)
075| self.cmndbtns.pack(side=‘top’, fill=‘x’)
076|
077| self.apparea = tk.Frame(self.wndw, border=3)
078| self.apparea.pack(side=‘top’, fill=‘both’, expand=True)
079| self.apparea.config(bg=‘#336699’, relief=‘sunken’)
080|
081| def _menubar (self):
082| ”’ Create menubar.”’
083| self.menubar = tk.Menu(self.root)
084|
085| def proxy (menu_id):
086| ”’Menu Command proxy.”’
087| return lambda: self.command(f’M:{menu_id}‘)
088|
089| # Create File Sub-Menu…
090| self.mbarFile = tk.Menu(self.menubar, name=‘fileMenu’, tearoff=0)
091| self.mbarFile.add_command(label=‘New’, command=proxy(‘New’))
092| self.mbarFile.add_command(label=‘Open…’, command=proxy(‘Open’))
093| self.mbarFile.add_command(label=‘Save’, command=proxy(‘Save’))
094| self.mbarFile.add_command(label=‘Save As…’, command=proxy(‘SaveAs’))
095| self.mbarFile.add_separator()
096| self.mbarFile.add_command(label=‘Exit’, command=proxy(‘Exit’))
097|
098| # Create Edit Sub-Menu…
099| self.mbarEdit = tk.Menu(self.menubar, name=‘editMenu’, tearoff=0)
100| self.mbarEdit.add_command(label=‘Copy’ , command=proxy(‘Copy’))
101| self.mbarEdit.add_command(label=‘Paste’, command=proxy(‘Paste’))
102|
103| # Create Help Sub-Menu…
104| self.mbarHelp = tk.Menu(self.menubar, name=‘helpMenu’, tearoff=0)
105| self.mbarHelp.add_command(label=‘About’, command=self.app_about)
106|
107| # Add sub-menus to MenuBar…
108| self.menubar.add_cascade(label=‘File’, menu=self.mbarFile)
109| self.menubar.add_cascade(label=‘Edit’, menu=self.mbarEdit)
110| self.menubar.add_cascade(label=‘Help’, menu=self.mbarHelp)
111|
112| # Add menubar to main window…
113| self.root.config(menu=self.menubar)
114|
115| def __repr__ (self):
116| return f’<{type(self).__name__} @{id(self):08x}>‘
117|
118|
119| if __name__ == ‘__main__’:
120| print()
121| app = SimpleWindowApp()
122| print(app)
123| app.root.mainloop()
124| print()
125|
This is essentially the same as the previous example except for the addition of the _widgets method (lines #38 to #79). This method creates a Frame (line #40), two Labels (lines #43 and #57), and five Buttons (lines #61 to #65).
The app window looks like this:
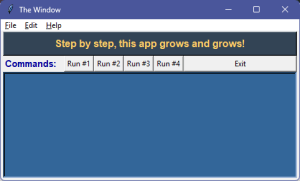
When run, and menu selections are made and buttons are clicked, the printout is:
<SimpleWindowApp @2cc91fe2900>
Command: M:New
Command: M:Open
Command: M:Save
Command: M:SaveAs
Command: M:Copy
Command: M:Paste
Command: B:#1
Command: B:#2
Command: B:#3
Command: B:#4
Command: B:Exit
Exit App
I used the Exit button to exit the app in the example above. This is apparent from the “B:” prefix on the id sent to the command method (lines #23 to #27). Had I used the menu selection to exit, it would have printed “M:Exit”. This allows different controls to activate the same command but still differentiate.
The command method can use cmd_id[2:] on its input to skip the prefix or, in this case on line #26, see if the string endswith a particular target string.
Note that with widgets we have three distinct stages: create the widget; configure its appearance; place, pack, or grid it to “map” it into the window. It’s the last action that makes the widget visible.
To get some sense of this, let’s return to IDLE and put the following into the editor window (you can type it into the shell window if you really want to, but we’ll be making changes, so I recommend the editor):
002|
003| # Create a window; set title; set geometry…
004| root = tk.Tk()
005| root.title(‘A Button-Test Window’)
006| root.geometry(‘480×240+300+100’)
007|
008| # Create a button widget…
009| btn = tk.Button(root)
010|
011| # Configure button…
012| btn[‘text’] = ‘Click Me!’
013| btn[‘command’] = lambda: print(‘Click!’)
014|
015| # Map button to window…
016| btn.pack(anchor=‘nw’)
017|
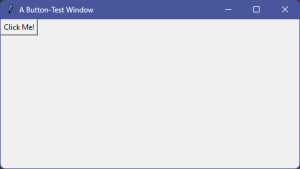
The first part (lines #3 to #6) is old hat. Lines #8 through #16 create a new button widget (line #9), configure its text and command callback (lines #12 and #13), and then pack it into the window using the anchor parameter set to ‘nw’ (northwest).
Run this to get this window:
Note there are two other ways to configure widgets. This code accomplishes the same thing:
002|
003| # Create a window; set title; set geometry…
004| root = tk.Tk()
005| root.title(‘A Button-Test Window’)
006| root.geometry(‘480×240+300+100’)
007|
008| # Create a button widget…
009| btn = tk.Button(root, text=‘Click Me!’)
010|
011| # Configure button…
012| btn.config(command= lambda: print(‘Click!’))
013|
014| # Map button to window…
015| btn.pack(anchor=‘nw’)
016|
But sets the text directly when creating the button and uses the config method to set the command callback function. The three techniques have the same effect. There are, by the way, many other properties of widgets that you can configure.
There are also different methods for mapping widgets into windows. Above we used the pack method; there is also a grid method:
002|
003| # Create a window; set title; set geometry…
004| root = tk.Tk()
005| root.title(‘A Button-Test Window’)
006| root.geometry(‘480×240+300+100’)
007|
008| # Create a button widget…
009| btn = tk.Button(root)
010|
011| # Configure button…
012| btn[‘text’] = ‘Click Me!’
013| btn[‘command’] = lambda: print(‘Click!’)
014|
015| # Map button to window…
016| btn.grid(row=0, column=0, sticky=‘nesw’)
017|
This produces the same window. The grid method is choice for when you want to align your widgets in neat rows and columns.
Lastly, you can place your widget:
002|
003| # Create a window; set title; set geometry…
004| root = tk.Tk()
005| root.title(‘A Button-Test Window’)
006| root.geometry(‘480×240+300+100’)
007|
008| # Create a button widget…
009| btn = tk.Button(root)
010|
011| # Configure button…
012| btn[‘text’] = ‘Click Me!’
013| btn[‘command’] = lambda: print(‘Click!’)
014|
015| # Map button to window…
016| btn.place(anchor=‘nw’)
017|
I haven’t used the place method in my own code yet, so won’t say more about it. Judging by tk.Place.place.__doc__, it has more capability than pack or grid.
We’ll end today with an important trick. Run the previous code in IDLE and notice you can still type things in the shell. Click the button a few times to see it print “Click!” to the shell window, then click the shell window, press [Enter] to get a prompt, and then type the following:
================= RESTART: fragment.py =================
>>> Click!
    Click!
    Click!

>>>
>>> root
    <tkinter.Tk object .>
>>> btn
    <tkinter.Button object .!button>
>>>
>>> root.geometry()
    '480x240+300+100'
>>> root.title('Custom Title')
    ''
>>>
>>> btn['text'] = 'New Button Text'
>>> btn['fg'] = 'red'
>>> btn['fg'] = '#009900'
>>> btn['font'] = ('Arial', 12, 'bold')
>>> btn.config(fg='#000000', padx=20)
>>>
Because we did not include a call to mainloop, the app is running but accessible to us from the shell window. We can interact with the window and its widgets (or the menu). This is explicitly designed into IDLE for Tk development and debugging. It’s a great way to find out how things work and what effect various tweaks have.
Notice what happens to the window when you give it a new title. Or how the button changes when you give it new text, foreground color, or font. The last line uses the config method but accomplishes the same thing. It’s handy for setting multiple properties at once.
Notice also the way many methods, such as geometry, if given no parameters return the current value.
That should be enough to get you started. Future posts will dive deeper into details and create some working apps. As an example, here’s a hex dump utility I made my intense dive into tkinter:
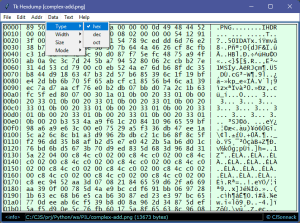
Which takes me back to the first Simple Tricks post.
That’s all for this time.
Link: Zip file containing all code fragments used in this post.
∅

ATTENTION: The WordPress Reader strips the style information from posts, which can destroy certain important formatting elements. If you’re reading this in the Reader, I highly recommend (and urge) you to [A] stop using the Reader and [B] always read blog posts on their website.
This post is: Tk Windows in Python
Pingback: Python Tk Calculator App | The Hard-Core Coder
Pingback: Tk Calculator App Extra | The Hard-Core Coder