
This series of posts is for those who have used a programming language before but are not familiar with Python.
The six introductory posts so far were a bird’s eye view of this popular programming language. Now we’ll dig deeper into the language, beginning with how to download, install, and start using Python.
The official Python website is https://www.python.org/. Below are links to pages with detailed information on how to install Python and get started using it:
- Download Python (main page)
- Python Releases for Windows
- Python Releases for macOS
- Python Setup and Usage (main page)
- Using Python on Windows (key page for Windows installs!)
- Using Python on macOS
- Using Python on Unix platforms
- Command Line and Environment (options and settings)
- IDLE — Python editor and shell (great for exploring Python!)
The first three pages have download links and information about the various available releases. What you download and install depends on your platform. I use Windows and can’t offer much advice for macOS or Android.
Windows users have several choices — see Using Python on Windows for details. The first choice involves picking the 32-bit or 64-bit version. To find out what your system is, press the Windows key (⊞) to open the Start Menu. In the search bar, type “CPU info” and press [Enter]. Alternately, open Windows Settings and navigate to System → About. The System type entry describes your system.
Windows users can also pick between the free version available through the Microsoft store — which installs automatically but lacks some features — or downloading and running an installer themselves. Users can pick the web installer that downloads what it needs or a standard Windows installer. I use the Windows installer. (Again, see Using Python on Windows for details.)
The last choice is which version to download. I’m using Python 3.13.7. The latest stable release is 3.14.3. My examples and documentation links are for 3.13 but will work fine in 3.14.
(If there is ever a release 3.14.15, that will be delicious!)
Unix and Linux Users: Python may already be installed. To find out, at a command prompt, type the following:
python --version
If that doesn’t work, try:
py --version
If Python is installed, it will print its version number:
Python 3.13.7
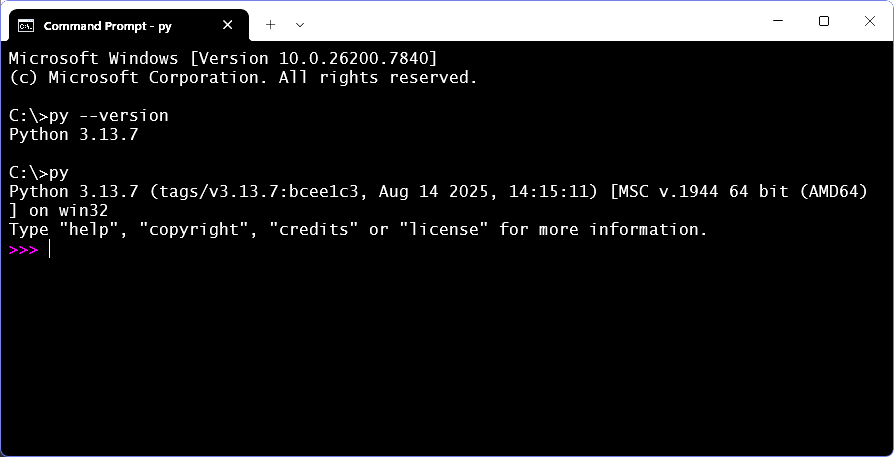
Windows Users: Once you install Python, open a command window (press the Windows key (⊞) and type cmd and press [Enter]). This opens a window with a prompt. Type py --version:

Python should reply with its version number. (Click the image for larger versions of these screen grabs.)
Next, type just py and press [Enter]. This puts you into the Python REPL environment (“read-evaluate-print-loop”). Now you are interacting with Python:
At the Python prompt, type some Python code:
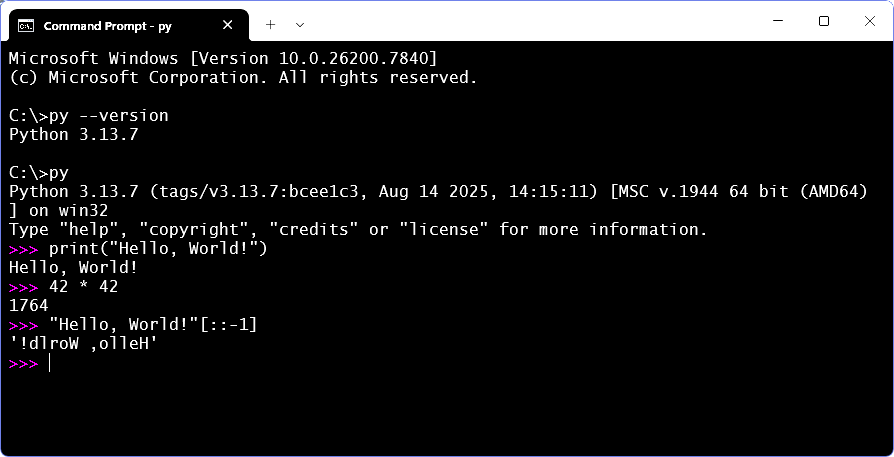
Congratulations. You’re off and started with Python.
Working in a command window isn’t much fun, though. Type quit to exit Python and return to a command prompt. Now type py -m idlelib (the -m option tells Python to open an existing module named idlelib).
You should get a window like this:
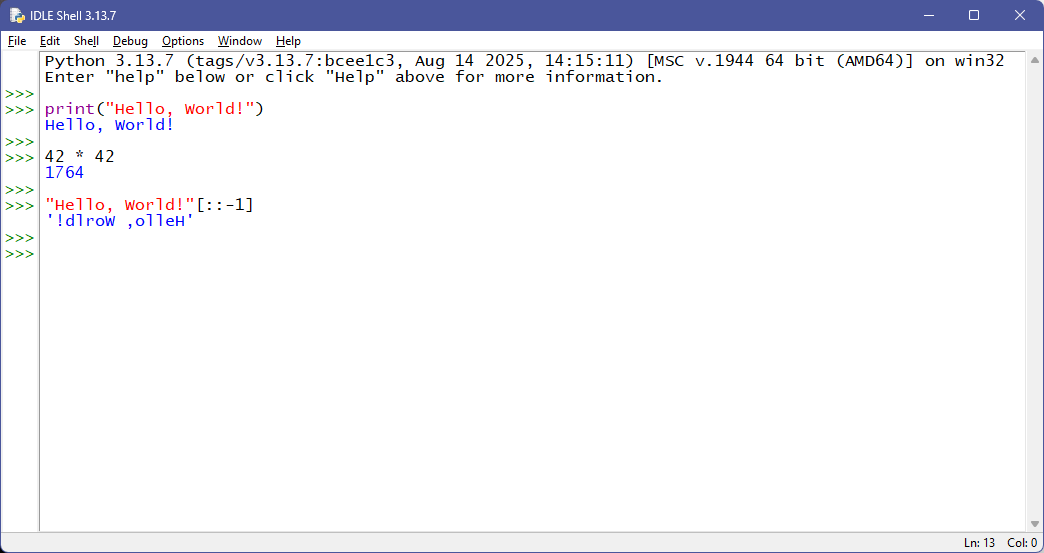
This is the Python IDLE — Integrated Development and Learning Environment. See the IDLE — Python editor and shell page for details. We can type the same simple lines of code we did in the command window, but now we have color syntax highlighting. And a great place to explore Python.
When done, close the window same as with any Windows app.
In your Windows Start apps list (under “P”) you should find something like this:
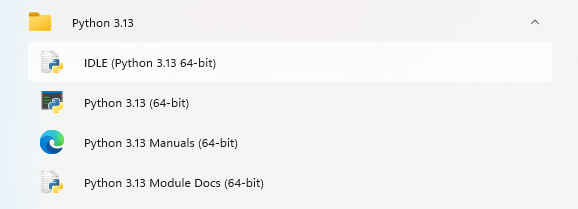
If you right-click the IDLE link, you can pin it to your Start menu or Taskbar to make it easy to open IDLE (pin Taskbar is in the More submenu).
Interacting with a Python prompt is useful for exploring and trying things but not much else. The IDLE prompt is smart enough to auto-indent, so it’s possible to write simple constructs:
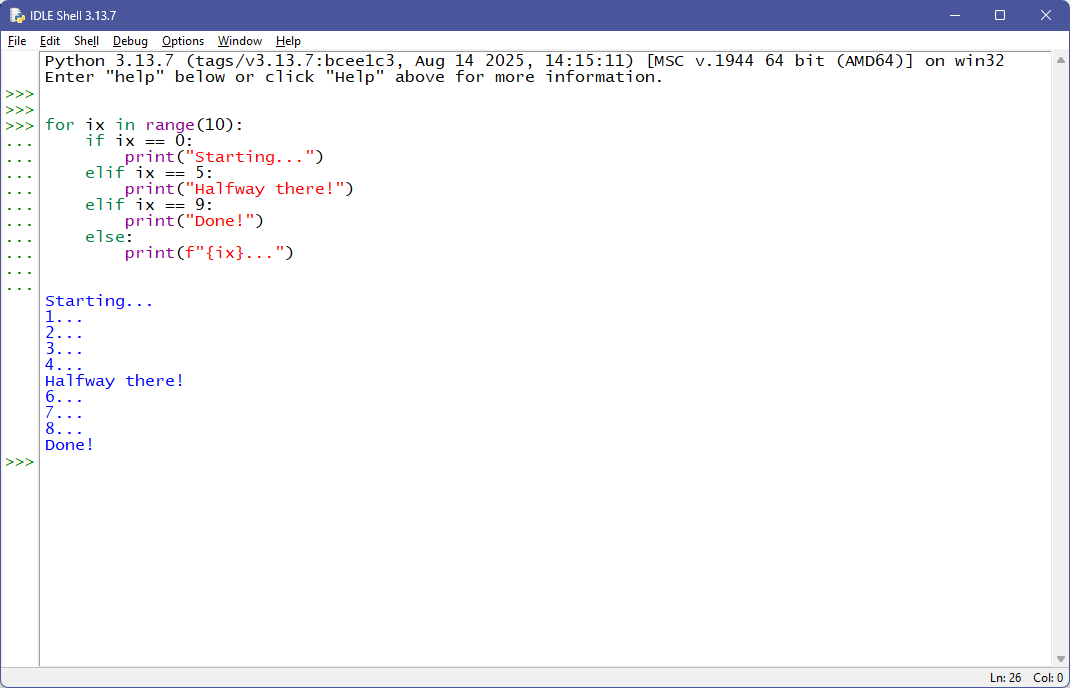
Each line that ends with a colon causes an auto-indented continuation (the [Backspace] key backs out of indents). But this still isn’t useful for writing serious code. We need a text editor (ideally, one that knows about Python).
Open the IDLE File menu:
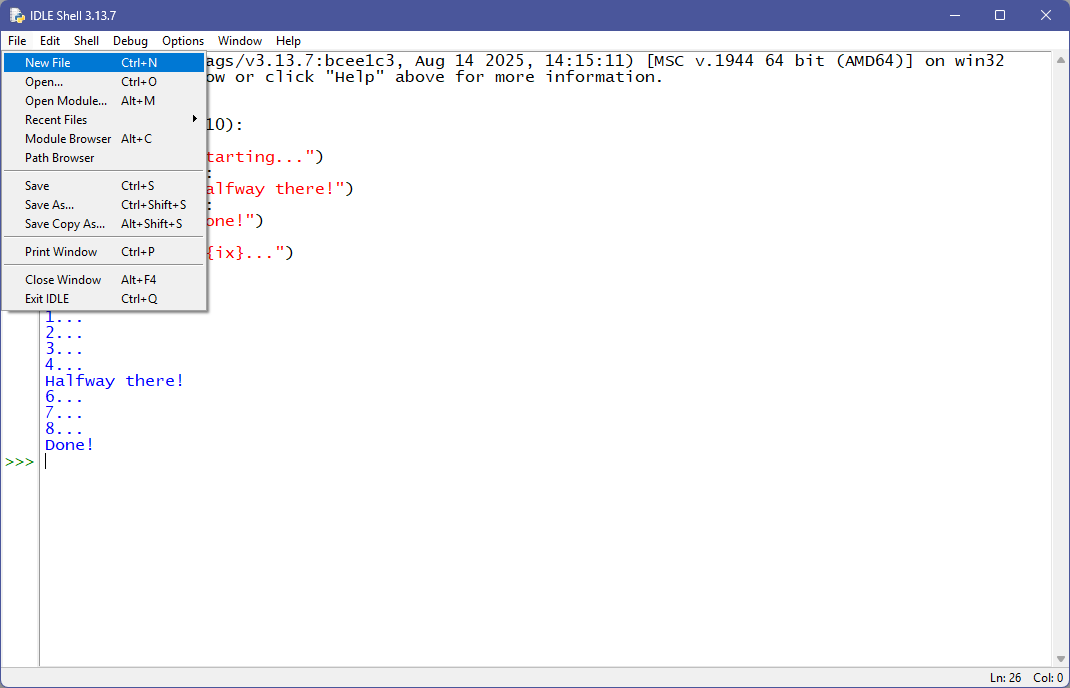
Click New File: IDLE opens a new editor window.
(Click Open... to select and open an existing file.)
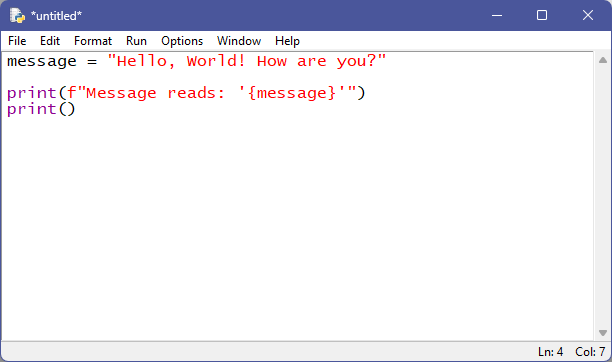
The new window has no text, so let’s type a very simple Python script:
To run this, we must save it first, so click File → SaveAs... to save it.
Which brings us to an important point.
Python scripts should be in their own folder, wherever we keep personal files and documents. On Windows, it might look something like this:
...\Documents\Python
...\Documents\Python\misc
...\Documents\Python\project1
...\Documents\Python\project2
...\Documents\Python\project3
:
:
It’s up to you how to organize your files (but you should definitely organize them). Large projects with multiple files should have their own folders, but a “miscellaneous” or “work” folder (or whatever) is fine for standalone scripts.
File organization is important with any application we use a lot. I do a lot of Python hobby programming, and at last count I have 716 Python scripts in over 200 Python project folders. Good organization is a must!
So, stop and take a moment to decide where to keep your Python files and how you might organize them. For now, you can start simple with a “Python” folder somewhere convenient.
Once we give the file a name and save it (let’s call it “first” — IDLE will save it as first.py), we can run it:
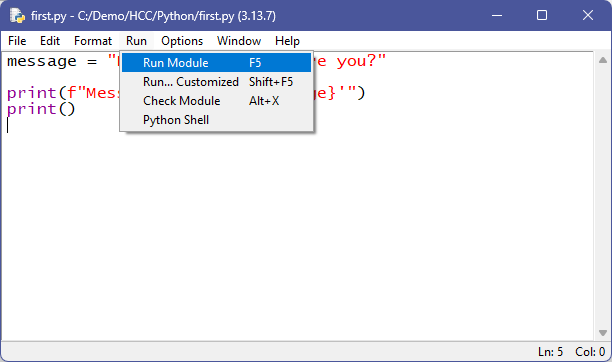
Either by selecting Run → Run Module or by pressing the F5 key.
Either way, back in the shell window, Python prints:
Message reads: 'Hello, World! How are you?'
Now you’ve written your first Python program. This is likely how you’ll do most of your first work in Python — using the IDLE.
The generic way to run (aka execute) a Python script looks like this:
PYTHON script.py arguments
The first part, PYTHON, is system dependent. It’s the name of Python runtime engine — the application that implements Python and executes our scripts.
After the Python application comes the Python script to run along with any arguments for the script. (These are available via the sys.argv variable.)
On my Windows 11 machine, PYTHON is:
"C:\Program Files\Python313\python.exe"
The Python313 part of the file path is because I’m using version 3.13.
So, my command lines look like this:
"C:\Program Files\Python313\python.exe" script.py arguments
Of course, this changes if the Python version changes.
To avoid this, on Windows Python installs C:\Windows\py.exe, which always points to the most recently installed version. Because C:\Windows is always in the PATH, on Windows the command line can be:
py script.py arguments
Assuming the current subdirectory contains script.py.
If not, use the script’s full filename:
py c:\documents\python\sandbox\script.py arguments
It’s not common (at least on Windows) to work with Python from the command line, but this command line syntax applies to any Windows BAT (batch) files we create to run scripts.
Perhaps more usefully, it also applies to Windows shortcuts:
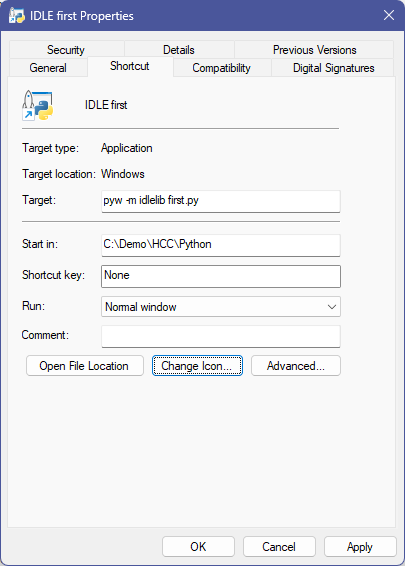
This shortcut opens IDLE on the first.py file we created above.
There are two wrinkles here. Firstly, rather than py, with IDLE we use pyw (Python “windowless”) because we don’t want a command window, just the IDLE window. Secondly, be sure to change the Start in: directory to where your Python script is.
Python scripts are just text files. We can write Python scripts using any text editor. The built-in IDLE editor is a good choice, especially in the beginning (I still use it a lot). There are many Python programming environments with powerful editors and other features, but IDLE is a fine place to start.
All the code fragments so far are simple scripts — they run, do their thing, and exit. (All code from the first six posts is in the ZIP file linked at the end of the previous post. Code from this post is available in the ZIP file linked at the end of this post.)
A script is a Python module. It can be run (aka executed) or imported for use by another module. Large Python programs are built from scripts we write as well as from existing modules in the Python Standard Library.
Modules thus operate in two distinct modes: when they are executed as the primary (or application or “main”) module, and when they are imported for use by another module.
Code at the top level — essentially everything against the left margin — is executed even when the module is imported.
Let’s start with a module we’ll name example_1.py:
002| print(“*** example_1: load”)
003|
004| def function_1 ():
005| “””The first function.”””
006| …
007| print(‘Function-1’)
008| …
009|
010| def function_2 ():
011| “””The second function.”””
012| …
013| print(‘Function-2’)
014| …
015|
016| def function_3 ():
017| “””The third function.”””
018| …
019| print(‘Function-3’)
020| …
021|
022| # Call the second function…
023| print(“*** example_1: call function_2”)
024| function_2()
025|
026| print(“*** example_1: exit”)
027|
On the left margin, there are three print statements (lines #2, #23, and #26), three function definitions (lines #4, #10, and #16), and a call to one of them (line #24).
When run (as a “main” script), this prints:
*** example_1: load
*** example_1: call function_2
Function-2
*** example_1: exit
The Python runtime engine:
- Executes the
printstatement on line #2, - Compiles the function definition on lines #4 to #8,
- Compiles the function definition on lines #10 to #14,
- Compiles the function definition on lines #16 to #20,
- Executes the
printstatement on line #23, - Executes the call to
function_2(line #24), - Executes the
printstatement on line #26.
These seven actions involve the top-level items of the script — the seven things on the left margin (three print statements, three def statements, plus the function call).
Note that top-level code is executed, but definitions are only compiled. “Executing” a function definition — which generally happens only once — compiles it into a function object bound to the function name. Code inside the function definitions is not executed until the function is called — which can happen many times. (Note this means bugs in functions go undiscovered until the function is called.)
Suppose we have a second module, call it example_2.py, that uses functions defined in example_1.py:
002| print(“example_2: load”)
003|
004| print(“example_2: import example_1”)
005| import example_1 as ex
006|
007| # Call the second function…
008| print(“example_2: call function_2”)
009| ex.function_2()
010|
011| print(“example_2: exit”)
012|
The import statement on line #5 gives us access to the code in example1.py through the alias name ex. Line #9 calls function_2 in that module.
Note that the module name is just example_1, not example_1.py.
When run, this prints:
example_2: load
example_2: import example_1
*** example_1: load
*** example_1: call function_2
Function-2
*** example_1: exit
example_2: call function_2
Function-2
example_2: exit
When we import example_1, the print statements execute, and so does the call to function_2. Possibly not what we wanted (assuming the code that ran in example_1 was code that should run only when we’re working with that module as primary — say during development and testing).
Let’s rewrite example_1.py:
002|
003| def function_1 ():
004| “””The first function.”””
005| …
006| print(‘Function-1’)
007| …
008|
009| def function_2 ():
010| “””The second function.”””
011| …
012| print(‘Function-2’)
013| …
014|
015| def function_3 ():
016| “””The third function.”””
017| …
018| print(‘Function-3’)
019| …
020|
021|
022| # Test for executing vs loading…
023| if __name__ == ‘__main__’:
024| # Code here only runs when module is run…
025| print(‘*** example_1: executing…’)
026|
027| # Call the second function…
028| print(“*** example_1: call function_2”)
029| function_2()
030|
031| print(“*** example_1: exit”)
032|
Line #23 should be in most, if not all, scripts. The special variable __name__ (“dunder name”) contains the name of the current module. When a module is executed, __name__ is set to the string “__main__”. When a module is imported, __name__ is set to the module name.
That’s what line #22 tests for. The code block (lines #24 to #31) only runs if the module is directly run.
At the top level, this script now has only the function definitions (which will still be compiled) and the if statement. (In fact, there is a fifth top-level object: the doc string in the first line. That text is programmatically available for documentation.)
When we import example_1, nothing is printed, but when we run it, we get the expected output.
If we run example_2.py, now it just prints:
example_2: load
example_2: import example_1
example_2: call function_2
Function-2
example_2: exit
With no output from example_1 (except from function_2).
Here is a basic template for a Python script:
002|
003| def main ():
004| ”’Main function.”’
005| …
006| …
007| …
008|
009| if __name__ == ‘__main__’:
010| print()
011| main()
012| print()
013|
If the script is executed, line #11 automatically calls the main function. If the script is imported, another script can call the main function, but it must do so explicitly — main won’t execute otherwise. (Note that you can use any name you wish instead of main. This is just a template.)
Here’s a more interesting example:
002| from sys import argv
003| from math import sqrt, sin, radians
004|
005| Ultimate = 42
006|
007| Agents = (86, 99)
008|
009| Colors = [
010| None,
011| ‘red’, ‘yellow’, ‘green’,
012| ‘cyan’, ‘blue’, ‘magenta’,
013| ]
014|
015| def hypotenuse (*args):
016| ”’Calculate a triangle’s hypotenuse.”’
017| x = float(args[0]) if 0 < len(args) else 1.0
018| y = float(args[1]) if 1 < len(args) else 1.0
019| return sqrt(pow(x,2) + pow(y,2))
020|
021| def height (*args):
022| ”’Calculate height given a baseline and angle.”’
023| base = float(args[0]) if 0 < len(args) else 10.0
024| angle = float(args[1]) if 1 < len(args) else 45.0
025| return base * sin(radians(angle))
026|
027| def colorname (*args):
028| ”’Get a color name from a index number.”’
029| cx = int(args[0]) if 0 < len(args) else 0
030| return Colors[cx]
031|
032|
033| def main (cmd, *args):
034| ”’Module’s main function.”’
035|
036| if cmd == ‘hypot’: return hypotenuse(*args)
037| if cmd == ‘height’: return height(*args)
038| if cmd == ‘clrname’: return colorname(*args)
039|
040|
041| if __name__ == ‘__main__’:
042| print(f’running: {argv[0]}‘)
043|
044| command = argv[1] if 1 < len(argv) else ”
045| arguments = argv[2:]
046|
047| rv = main(command, *arguments)
048| print(f’{command} = {rv}‘)
049| print()
050|
When Python loads this module — either when executed or when imported — it does the following (line-by-line from top to bottom):
- Line #1 is a document string that becomes the module’s
__doc__value. - Line #2 imports the
argvvariable from thesysmodule. This is a list of any runtime command line arguments (or empty if none were provided). We reference this list in lines #44 and #45. - Line #3 imports three math functions:
sqrt(square root),sin(sine), andradians(converts degrees to radians for the sine function). We need these functions in the code. - Line #5 sets the name
Ultimateto the integer object with value42. - Line #7 sets the name
Agentsto atupleobject with two integer values. - Lines #9 to #13 set the name
Colorsto alistobject containing strings. - Lines #15 to #19 define a function object named
hypotenuse. - Lines #21 to #25 define a function object named
height. - Lines #27 to #30 define a function object named
colorname. - Lines #33 to #38 define a function object named
main. - Lines #41 to #49 are an
ifstatement and its code block.
At this point, the global variables Ultimate, Agents, and Colors are created and have values. The four function objects, hypotenuse, height, colorname, and main, are compiled. So is the if statement’s code block (lines #42 to #49).
But the only code that has been actually run is lines #1 through #13 — these have altered the state of the module by binding values to names. Code in the functions (and final code block) has not been run at this point. Line #41 is also run — it’s at the top level (i.e. left margin) — but how Python reacts depends:
When Python imports the module, the if statement is false, and the above is all that happens. (Because when importing this module, Python sets __name__ to the value “example_3”.) Depending on exactly how the module is imported (see below), objects in it are available to the importing script. (Just like the math module functions we imported were in this one.)
When Python executes the module, the if statement is true, and Python executes its code block:
- Line #42: the
printstatement accesses the importedargvlist’s first item, which Python sets to the name of the script. So, this line prints the script’s name. - Line #44: if argv has more than just the one item, they are command line arguments. Our code expects the first argument to be a command “verb”. If not provided, the default is an empty string.
- Line #45: we extract from
argva slice starting with the second argument (third list item) and including all items to the end. Line #44 requires a test because accessing a list element that doesn’t exist raises anException. This line doesn’t need to test because slices always work. Ifargvdoes not have the items defined by the slice, the result is an empty list. So,argumentsis either an empty list (no arguments) or the arguments from the command line. - Line #47: calls the
mainfunction, passing itcommandandarguments. (Note the syntax. See part 5 for a refresher.) - Lines #33 to #38: the
mainfunction uses the command value to call one of the module functions and return its value. If the command doesn’t match any of theifstatements, the function just falls through (and returnsNone). - Line #48: print
commandandrv(returned value). - Line #49: print a blank line.
Lastly, let’s look in more detail at importing (something we need with almost every script we write — as we did in the one above).
We can import the whole module, thus giving ourselves access to all its top-level code objects:
002|
003| # Import the entire module…
004| import example_3
005|
006| print(f’{example_3.Ultimate = }‘)
007|
008| print(f’{example_3.colorname(3) = }‘)
009|
Access to an object then uses this syntax:
module-name . object-name
To reduce typing, we can give example_3 an alias:
002|
003| # Import entire module with an alias…
004| import example_3 as ex
005|
006| print(f’{ex.Ultimate = }‘)
007|
008| print(f’{ex.colorname(3) = }‘)
009|
Now the syntax is:
alias-name . object-name
Note that providing an alias hides the original name. In the example above, the name example_3 isn’t in the namespace and can’t be used.
We can also import just the objects we intend to use from the module:
002|
003| # Import only objects we’ll use…
004| from example_3 import Ultimate, colorname
005|
006| print(f’{Ultimate = }‘)
007|
008| print(f’{colorname(3) = }‘)
009|
This reduces the syntax to just:
object-name
Which was how we used import in example_3 — grabbing only the objects we intended to use.
We can give imported objects aliases:
002|
003| # Import only objects we’ll use with aliases…
004| from example_3 import Ultimate as Ult, colorname as cn
005|
006| print(f’{Ult = }‘)
007|
008| print(f’{cn(3) = }‘)
009|
Here we cannot refer to the names Ultimate or colorname, only Ult and cn.
Finally, we can import all the objects blindly:
002|
003| # Import all objects…
004| from example_3 import *
005|
006| print(f’{Ultimate = }‘)
007|
008| print(f’{colorname(3) = }‘)
009|
This is not a good general practice because it imports all the names in the module, which pollutes the namespace. It should be reserved for tests or quick-and-dirty one-off scripts.
That’s enough for this time.
Link: Zip file containing all code fragments used in this post.
∅

ATTENTION: The WordPress Reader strips the style information from posts, which can destroy certain important formatting elements. If you’re reading this in the Reader, I highly recommend (and urge) you to [A] stop using the Reader and [B] always read blog posts on their website.
This post is: This is Python! (part 7)
Pingback: This is Python! (part 8) | The Hard-Core Coder
Pingback: This is Python! (part 9) | The Hard-Core Coder
Pingback: This is Python! (part 10) | The Hard-Core Coder