
Some of you may have encountered the Logo programming language or one of its many offshoots. A memorable aspect of Logo was its use of turtle graphics — a form of vector graphics similar to pen plotters. Notably, turtle graphics features a relative drawing cursor.
Standard Python includes a turtle graphics module. It doesn’t have a huge production value (there’s no easy way to save an image, for instance), but it can be fun to play with.
 We can compare turtle graphics to the old Etch A Sketch toys. Those mechanical drawing devices had two knobs, one that controlled horizontal movement of the drawing cursor, and one that controlled vertical movement. Drawing diagonal lines required small steps of horizontal and vertical to create the desired diagonal.
Turtles can move in any direction at any angle, but what they share in common with the Etch A Sketch is that drawing is always relative from where the cursor is at the moment. Drawing a specific image requires some thinking ahead to plan the lines, since each new line begins where the last one left off.
However, turtle graphics has two features the Etch A Sketch doesn’t. Firstly, you can move the cursor without drawing. Turtles have “pen down” and “pen up” commands that control whether they leave a line or not during movement. Secondly, turtles have commands that can move them instantly (without drawing) to a new point. So, turtles can jump around.
Let’s jump in with the example from the Python documentation for the turtle module:
002|
003| def draw_star (length=200, angle=170):
004| ”’Draw multi-point star.”’
005|
006| # Set pen and fill colors…
007| color(‘red’, ‘yellow’)
008|
009| # Use filling for this shape…
010| begin_fill()
011|
012| # Infinite loop (be sure to exit!)…
013| while True:
014| # Draw a straight line LENGTH long…
015| forward(length)
016|
017| # Turn left ANGLE degrees
018| left(angle)
019|
020| # If we’re back where we started…
021| if abs(pos()) < 1:
022| # We’re done, exit loop…
023| break
024|
025| # Fill the shape drawn since begin_fill…
026| end_fill()
027|
028| # And we’re done…
029| done()
030|
031| draw_star()
032|
I added comments and turned it into a callable function with parameters to make it easy to experiment, but it’s functionally the same routine as in the docs. When run, this opens a Tkinter window for drawing. When the drawing is done, closing the window returns control to the Python script.
Note that, because the draw_star function calls the turtle.done method, you cannot call draw_star more than once in the script. Move the done method to the end of the script to allow that. Alternately, leave it off entirely as I have in the examples below. I included it here because the example in the Python docs does. The method is associated with the turtle.mainloop method in the screen events section, so I believe these methods are for implementing interactive windows. None of these examples explore that aspect, so both methods can be ignored here.

Figure 1.
Using the defaults, the image drawn should look like Figure 1.
As mentioned already, there’s no easy way to save an image to file. The simplest recourse is to make a screen capture using whatever tools you have for that.
In Windows, for example, the old [Alt]+[Print Screen] key combo captures the active window to the clipboard, and from there you can paste it into a graphics program you can save it to file from.
Windows also has [⊞]+[Shift]+[S] to bring up the screen capture interface. I haven’t used Apple computers enough to offer any tips on screen capture, but I’m sure there are ways (it’s certainly possible on my iPhone and iPad).
One can use the turtle.getcanvas method to get a reference to the Tkinter Canvas that underlies the Turtle Screen, but obviously this requires knowing how to use Tkinter objects.
One thing you can try with the code above is providing different angles. In particular, note that an angle of 90 draws a square box, an angle of 60 draws a hexagon, and an angle of 45 draws an octagon. Angles close to 180 create stars with lots of sharp points. Don’t be afraid to experiment.
Here’s an example that uses more of the turtle features:
002| from turtle import Screen, Turtle
003|
004| xmin, xmax = (–2000, +2000)
005| ymin, ymax = (–2000, +2000)
006|
007| def random_walk (steps=100, distance=100):
008| ”’Send the turtle on a random walk.”’
009| # Get a turtle canvas…
010| wdw = Screen()
011|
012| # Heading mode: east=0, angles counterclockwise…
013| wdw.mode(‘standard’)
014|
015| # Set canvas size…
016| wdw.setworldcoordinates(xmin,ymin, xmax,ymax)
017|
018| # Set color mode [0-255] or [0-1.0]…
019| wdw.colormode(255)
020|
021| # Get a turtle for drawing…
022| tur = Turtle()
023|
024| # Using degrees (not radians)…
025| tur.degrees()
026|
027| # Set speed of turtle animation…
028| # (0-10 or fastest|fast|normal|slow|slowest)
029| tur.speed(“fastest”)
030|
031| # Set width of drawn lines…
032| tur.pensize(2)
033|
034| # Go for a (random) walk…
035| for s in range(steps):
036| tur.left(random()*360.0)
037| tur.forward(distance)
038| # Check for crossing window edge…
039| x,y = tur.position()
040| x0,y0 = x,y
041| if x < xmin: x0 += (xmax – xmin)
042| if xmax < x: x0 -= (xmax – xmin)
043| if y < ymin: y0 += (ymax – ymin)
044| if ymax < y: y0 -= (ymax – ymin)
045| # Wrap around if necessary…
046| if (x0 != x) or (y0 != y):
047| tur.penup()
048| tur.setposition(x0,y0)
049| tur.pendown()
050|
051| # Draw a red dot at end of walk…
052| tur.dot(10, (255,0,0))
053|
054| # Make the pen blue…
055| tur.pencolor(0, 0, 255)
056| tur.pensize(5)
057|
058| # Draw (blue) line back to start…
059| tur.home()
060| # s/a:
061| #tur.setposition(0.0, 0.0)
062| #tur.setheading(0)
063|
064| # Draw a red dot…
065| tur.dot(10, (255,0,0))
066|
067| random_walk(steps=1000, dist=200)
068|
When run, this generates a random walk image (see Figure 2 for an example — the output will be different each time the program is run).
The example shows how to control the heading mode (line #13), window size (line #16), color mode (line #19), angle mode (line #25), speed (line #29), and line width (line #32). Most are self-descriptive. Angle mode for headings is either degrees or radians — each has their own method. Color mode is either 1.0 or 255, which determines whether color values are 0.0-1.0 or 0-255.

Figure 2.
If you play with the Python turtle for very long, you’ll probably end up setting the speed to fastest possible all the time. The slower animation is fun at first, but it gets old if you’re running a pattern repeatedly.
The random walk loop uses a simple implementation of torus mapping. That is, of joining the left-right edges and the top-bottom edges such that running off one edge of the screen “teleports” you to the opposite side.
But you’ll note some incomplete lines with this happens. Fixing it is left as an exercise for the reader, but a hint is that lines that cross the edge need to be drawn twice, once on each side.
Just for fun, when the random walk stops, we put a red dot at the end of the walk, draw a thick blue line back to the start, and draw another dot there. This is just to illustrate how far (or not) the random walk got from the start.
Reader exercise: Make the random walk more interesting by changing the pen color, either at random intervals or continuously over time.
Here’s a function that uses turtle graphics to draw a Sierpiński Triangle:
002|
003| def sierpinski_triangle (levels=6, distance=100, xmax=6400, ymax=5600):
004| ”’Draw the Sierpinski Triangle.”’
005|
006| def expand_string (s):
007| ”’Expand command string.”’
008| buf = []
009| for ch in s:
010| # Expand X into Y+X+Y…
011| if ch == ‘X’:
012| buf.append(‘Y+X+Y’)
013| continue
014| # Expand Y into X-Y-X…
015| if ch == ‘Y’:
016| buf.append(‘X-Y-X’)
017| continue
018| buf.append(ch)
019| return ”.join(buf)
020|
021| # Generate a drawing program LEVELS deep…
022| program = ‘X’
023| for ix in range(levels):
024| program = expand_string(program)
025|
026| # Get a Screen to draw on…
027| wdw = Screen()
028| wdw.title(‘Sierpinski Triangle’)
029| wdw.mode(‘standard’)
030| wdw.colormode(255)
031| wdw.setworldcoordinates(–20,–20, xmax,ymax)
032|
033| # Get a Turtle for drawing…
034| tur = Turtle()
035| tur.degrees()
036| tur.speed(“fastest”)
037| tur.pensize(2)
038|
039| # Draw the Sierpinski Triangle…
040| xlim, ylim = 0, 0
041| for cmd in program:
042| if cmd == ‘+’:
043| tur.forward(distance)
044| tur.right(60)
045| elif cmd == ‘-‘:
046| tur.forward(distance)
047| tur.left(60)
048|
049| # Keep track of how big the triangle gets…
050| x,y = tur.position()
051| if xlim < x: xlim = x
052| if ylim < y: ylim = y
053|
054| tur.penup()
055| tur.home()
056| print(f’Maximum X: {xlim}’)
057| print(f’Maximum Y: {ylim}’)
058| print()
059|
060| sierpinski_triangle(levels=4, xmax=1600, ymax=1400)
061|
The turtle drawing code (lines #26 to #55) is much the same as in the previous example. But instead of a loop drawing random segments, the loop is driven by a “drawing program” consisting of “+” and “-” characters that tell the turtle to turn right or left (respectively).

Figure 3.
When run, this generates a Sierpiński Triangle. The levels parameter controls how deep the recursion goes and hence how many sub-triangles the final triangle has.
Figure 3 shows a run with levels=8.
The more levels the triangle has, the larger the larger xmax and ymax have to be. The program prints out the maximum extent the turtle reached to help determine what xmax and ymax need to be. Run once to find those limits; run again with appropriate settings for xmax and ymax.
For example, to generate Figure 3, I needed xmax=26000 and ymax=24000.
Note that, as written, an odd number of levels draws the triangle upside down, so ymax needs to be negative. Also note that doing this inverts the Y-axis and the triangle is drawn right-side-up.
Ideally, one should link the levels parameter to a table of correct coordinates for that level so sizing can happen automatically. This is left as an exercise for the reader.
Turtle graphics are a natural fit for drawing Euler Spirals, which are defined as a series of moves and turns [for more, see Euler Spirals and Pi Paths]:
002| from turtle import Screen, Turtle
003|
004| xmin, xmax = (–1300, +700)
005| ymin, ymax = (–0000, +2000)
006|
007| def euler_spiral (theta, steps=1200, distance=50):
008| ”’Draw an Euler Spiral.”’
009|
010| # Get a Screen to draw on…
011| wdw = Screen()
012| wdw.title(f’Euler Spiral – {theta:.12f} – {steps:,}’)
013| wdw.mode(‘standard’)
014| wdw.colormode(255)
015| wdw.setworldcoordinates(xmin,ymin, xmax,ymax)
016|
017| # Get a Turtle for drawing…
018| tur = Turtle()
019| tur.degrees()
020| tur.speed(“fastest”)
021| tur.pensize(1)
022|
023| # Min/max vars for edge tracking…
024| x0,x1, y0,y1 = 0,0,0,0
025|
026| # Draw the spiral…
027| for ix in range(steps):
028| # Forward…
029| tur.forward(distance)
030| # Turn left…
031| tur.left(fmod(ix*theta, 360.0))
032| # Crude “progress bar”…
033| if (ix % 100) == 0:
034| print(ix)
035|
036| # Keep track of how big the space gets…
037| x,y = tur.position()
038| if x < x0: x0 = x
039| if y < y0: y0 = y
040| if x1 < x: x1 = x
041| if y1 < y: y1 = y
042|
043| # Return the turtle to the start…
044| tur.penup()
045| tur.home()
046|
047| # Report how far the turtle went…
048| print(f’Min/Max X: {x0}, {x1}’)
049| print(f’Min/Max Y: {y0}, {y1}’)
050| print()
051|
052| euler_spiral(1.123456789)
053|
Most of the code is setup as in previous examples. There is also code to track how var the turtle goes (line #24 and #37-#41). The part that does the drawing (lines #27 to #34) is very simple and roughly resembles the random walk code above. The difference is that, rather than a random angle to turn, the function takes an angle parameter, theta, which it progressively multiplies by itself to get an infinite series of growing angles:
theta, 2×theta, 3×theta, 4×theta, 5×theta, … n×theta, for a sequence with n steps.
Because angles have a 360° modulus, the series wraps around. For example, if theta=45° (a very large angle that doesn’t give an interesting spiral — try it), the series runs:
45°, 90°, 135°, 180°, 225°, 270°, 315°, 0°, 45°, 90°, … for however many steps.

Figure 4.
When run as shown above with a theta of 1.123456789, the result is Figure 4.
The result is a series of spirals that are extremely sensitive to the input angle, theta. Readers are encouraged to experiment with tiny changes between 1.0 and 2.0.
For one example, try theta=1.1010101 and steps=3000. You’ll also need to set xmin=-2000, xmax=2000, ymin=0, and ymax=4000.
For another, try theta=1.0101010 and steps=4000 (with xmin=-2000, xmax=2000, ymin=-2000, and ymax=2000). You’ll find that this creates a symmetrical pattern, and the turtle follows this over and over forever. The complete pattern is drawn after 3000 steps. Setting it to 4000 lets you confirm the turtle is definitely retracing its steps.
The post I linked to above has many more examples you can try.
The last example is a test platform for experimenting:
002| from turtle import Screen, Turtle
003|
004| xmin, xmax = (–2000, +2000)
005| ymin, ymax = (–1500, +1500)
006|
007| def do_turtle_program (program):
008| ”’Draw a given program of steps.”’
009|
010| # Get a Screen to draw on…
011| wdw = Screen()
012| wdw.setup(width=1500, height=1000, startx=0, starty=0)
013| wdw.title(f’Turtle Test’)
014| wdw.mode(‘standard’)
015| wdw.colormode(255)
016| wdw.setworldcoordinates(xmin,ymin, xmax,ymax)
017|
018| # Get a Turtle for drawing…
019| tur = Turtle()
020| tur.degrees()
021| tur.speed(“fast”)
022| tur.pensize(1)
023| tur.pencolor(0,0,0)
024|
025| # Min/max vars for edge tracking…
026| x0,x1, y0,y1 = 0,0,0,0
027|
028| # Draw the spiral…
029| for cmd in program:
030| match cmd[0]:
031| # Draw a line, angle, distance…
032| case ‘line’:
033| # Turn…
034| tur.left(cmd[1])
035| # Forward…
036| tur.forward(cmd[2])
037|
038| # Set the pen color…
039| case ‘color’:
040| tur.pencolor(cmd[1])
041|
042| # Set the pen color…
043| case ‘width’:
044| tur.pensize(cmd[1])
045|
046| # Set turtle heading to angle…
047| case ‘head’:
048| tur.setheading(cmd[1])
049|
050| # Move the turtle to X, Y…
051| case ‘move’:
052| tur.penup()
053| tur.goto(cmd[1], cmd[2])
054| tur.pendown()
055|
056| # Unknown command, so complain…
057| case _:
058| raise RuntimeError(f’Unknown command: “{cmd[0]}”‘)
059|
060| # Keep track of how big the space gets…
061| x,y = tur.position()
062| if x < x0: x0 = x
063| if y < y0: y0 = y
064| if x1 < x: x1 = x
065| if y1 < y: y1 = y
066|
067| # Return the turtle to the start…
068| tur.penup()
069| tur.pencolor(0,0,0)
070| tur.home()
071|
072| # Report how far the turtle went…
073| print(f’Min/Max X: {x0}, {x1}’)
074| print(f’Min/Max Y: {y0}, {y1}’)
075| print()
076|
077| diagonal = sqrt(pow(2000,2)+pow(1500,2))
078|
079| program = [
080| (‘move’, 2000,–1500), (‘color’, (0,0,255)), (‘width’, 3),
081| (‘line’, 90, 3000),
082| (‘line’, 90, 4000),
083| (‘line’, 90, 3000),
084| (‘line’, 90, 4000),
085| (‘move’, 2000, 0), (‘color’, (255,0,0)), (‘width’, 2),
086| (‘line’, 143.13, diagonal), # 180-36.87
087| (‘line’, 73.74, diagonal), # 2 * 36.87
088| (‘line’, 106.26, diagonal), # 180 – (2 * 36.87)
089| (‘line’, 73.74, diagonal),
090| (‘head’, 270), (‘color’, (0,0xcc,0)), (‘width’, 4),
091| (‘line’, 0, 4000),
092| ]
093| do_turtle_program(program)
094|
It also shows how you can use a small simple program to control the turtle rather than hand-coding a routine to draw what you want. You can expand on the concept to include other turtle commands of interest for your application.
The drawing function (lines #7 to #73) takes a list of command tuples where the first element is a command. The match structure (lines #32 to #54) acts on this command element to execute the requested turtle command.
One new wrinkle in this example is the turtle.setup method, which allows setting the window size. This is different from the turtle.setworldcoordinates method which sets the coordinate mapping of the window. Note how we’re setting the window size to 1500×1000 pixels, but the coordinates run from -2000 to +2000 on the X-axis and from -1500 to +1500 on the Y-axis.
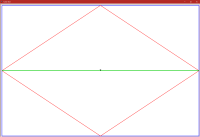
Figure 5.
Lines #79 to #92 contain a simple program to draw a box, a diamond, and a horizontal line (see Figure 5).
Note how the turtle commands use the coordinate mapping. The blue box is from -2000 to +2000 on the X-axis and from -1500 to +1500 on the Y-axis. But the window is 1500 pixels by 1000 pixels.
Be sure to use the turtle.setworldcoordinates method after setting other parameters to ensure the coordinate mapping isn’t inadvertently changed.
These should give you a good start on exploring Python Turtle. Have fun!
Link: Zip file containing all code fragments used in this post.
∅

ATTENTION: The WordPress Reader strips the style information from posts, which can destroy certain important formatting elements. If you’re reading this in the Reader, I highly recommend (and urge) you to [A] stop using the Reader and [B] always read blog posts on their website.
This post is: The Python Turtle
Here’s the Euler Spiral for
theta=1.1010101 andsteps=3000:Here’s the Euler Spiral for
theta=1.0101010 andsteps=4000: